Saturday, June 30, 2012

Bleached Tie-Dye Shorts

Bleach TIE-DYED Shorts!

What you will need:
- A pair of jean shorts
- A bottle of bleach
- A "bleach bucket"
- Rubber bands


Step One
First thing is first... There's no "right" way to do the rubber-banding. More than likely whatever you do will end up looking cool! So grab your rubber bands and start making little nubs all over the shorts. This is where you will get what I call the "tie-dye bursts".


This doesn't look particularly pretty but just make sure that the rubber bands are wrapped tightly. Over-all, including the back, I used about 17 rubber bands to make the nubs.


Step Two
Next thing you will need to do is use a few more rubber bands to compact the shorts into some sort of ball. There isn't a method to this. Just rubber band off big sections of the shorts.
I used 4 rubber bands to finish up the process.


Step Three
Next you will make your bleach tie-dye solution, which is really simple:
1 part bleach & 1 part water
This is where you will also need your bleach bucket. I bought this big white tub at Five Below for $5. It comes in handy for a lot of different things so consider it a crafting investment!


Honestly, I just put some water in the bucket then dump the a whole thing of bleach in. When you're doing tie-dye you really only get one chance. So, that measuring cup is just there to set on top of the shorts to hold them under the solution but you can measure if you want.


I let them soak like this for about two hours. Occasionally, I would go in and swish them around a bit. 


Step Four
Once you have the desired color (they will lighten when you wash them) take them out and rinse them off BEFORE taking the rubber bands off. You don't want bleach to run where you were trying to keep it from! After you have completely rinsed them you can start pulling off the rubber bands.


So, here are my shorts before I put them through the washer! I'm pleasantly surprised with how the turned out! Next, I put them through the washer TWICE. Bleach sticks around and it smells so I like to get it all out of the fabric before I attempt to wear them.


The Finished Product


Tuesday, June 12, 2012

Bleach Dyed Shorts: 2

Bleach Dyed Shorts
Part 2

Okay, so hopefully you all read my previous post: Bleach Dyed Shorts
Above is how they turned out and I can't say I'm too disappointed! Obviously I folded them up and I think they're still a smidge long so for this post I am going to "fix them up".

Double The Fold & Sew
So basically I folded them over one more time and stitched them in place! I hate "roll-up" shorts that I always have to adjust. So I sewed the inside and outside of both legs then put a little stitch in the middle (front and back) to keep the fold up! The best part is that you don't have to make it look perfect.

Much better! 


Add A Little Lace

I wanted to bring the white up into the short a little more so I used this thick lace to enhance the pockets. This is just some lace I cut off the end of an old pillow case! It's a little off-white and I could have bleached it to match. But I decided not to because I like the off-white mixed with white look. I hand stitched the lace over the top of the pocket.


Lacey bleach dyed shorts. You could also use studs at the top of the pockets for a more rock 'n roll look. I think I might try that with my next pair... I'll let you know how it goes!

And Ta-Da! There you have it. Bleach dyed shorts with a little lace!

DIY Bleach Dyed Shorts


Bleach Dyed Denim Shorts

Hi all!  I haven't blogged in awhile... Although there a million projects I have underway. Life gets crazy, ya know? Well, I am back to blog all about the things I find interesting and cool.  And what's more interesting or cooler than DIY fashion pieces?? Here's what I love about DIY and fashion coming together; you really can't mess it up! As long you have the confidence to rock what you made then you made something brilliant.  I'm saying all this because in the midst of my typing I am waiting to see the outcome of my bleach dyed denim shorts... So here it goes ladies!


What You'll Need:


Step One: Pick Your Pair
I went with a pair of shorts that are too big on me and also are "roll-up" style so that I had a lot of length to work with.  (Remember I'm 5'10''.. You may not all have this issue with shorts.. LUCKY!) This also gives me a little more freedom with the scissors and what I could cut away. I also went with an inexpensive pair from Target so that if I did somehow ruin them I wouldn't be too heart broken. Don't have a pair of old shorts sitting around? Grab a pair of old jeans!  You're going to end up chopping off some of the fabric either way. 

Step Two: Snip Snip Snip!
So here is where your scissors and ruler come into play. You're going to want to cut off AT LEAST the bottom hem. This way you will get that frayed look that's "in" right now. Please ladies, do not cut off too much! You can always cut more if you think they're still too long but you can't really add back on easily... And there's not a lot of things less attractive then a girl wearing shorts that aren't flattering. 
Just because they zip... Anyways here are my snip tips:

1. Try the shorts (or jeans) on. Check yourself out and see where you could bare to spare some fabric.

2. Take the shorts off and turn them inside out. Now put them back on! 

3. Use the ruler and sharpie to mark your cutting point. I did about 1.5 inches but I also started with really long shorts. Make a few more marks on both legs so that you stay on the straight line. Now strip!

4. IF you're using jeans cut a little below your marks and try them on again before you commit to the full snip. If you're using shorts then snip across the line!

5. While you are cutting make sure that the hem is lined up. A lot of time this means that the top won't be lined up and that's OK. Just make sure the bottom hems on the legs match up.

6. Now that you've snipped turn them back right-side out and try them on one more time. Kind of decide now the "look" you want.

LOOK OPTIONS:
- Bleach from the bottom and leave the top dark (like mine!)
- Bleach from the top and leave the bottom dark
- Bleach for an ombre effect
- Bleach only the very tips at the bottom
- Bleach only the waist band
- Get crazy creative and only dye one leg
- Bleach the whole damn pair!

ANOTHER TIP:
If you want a more destroyed look you can use a nail file and rub some holes into the denim. I opted not to do this but when you wash them you will get a really great frayed look. Store quality even!


Step Three: Get Ready To Dye
Because there is someone standing right behind you..... Just kidding! A little play on words there for you girls.  Ok, so let's prepare where you are going to be doing this messy business. I've seen examples of people using their kitchen sink. This would work really well if you didn't use your kitchen sink as storage for your dirty dishes like myself. I opted for the tub and a bucket. Well, more like an old popcorn tin but a bucket non-the-less!


FYI this actually takes a lot of time. You just have to be patient while the bleach does its thing. And it WILL do its thing.

1. One part water and one part bleach. Fill your bucket/sink with your dye solution. 
(I found myself adding more and more as I went)

2. Get ready and dip! I submerged mine up until the point where I wanted to keep the original denim. Just let the shorts soak at this level for a little while. They will not go white immediately.  It took mine about an hour and a half+ to get them super light. (More dye will come off in the washer so just aim for light blue)

3. Keep shifting your shorts! Every now and then I would pop in and swish the shorts around in the bleach. Getting a little bit in unwanted areas isn't the end of the world. It takes a lot of bleach and soaking to dye dark denim. If you're going for the ombre look you can start adjusting the level at which you soak your shorts. Keep doing this!


4. Add some bleach and water. IF you think you need a deeper pool to dip in just add some more! There is no precise way to add the bleach and water. Just go for the effect that you are hoping for. As you can see in the above picture I used hair clips to hold up the shorts. I don't think I really needed them there so if you don't have them don't worry about it.

5. You're almost done! Once the shorts are really light or how you would like them it's time to move to the washing machine. Rinse the shorts off first before putting them into the machine. Add a smidge of detergent to help wash the bleach out and a little bit of oxi-pro or borax to help give it the destroyed look.


Before The Washer...


After The Dryer...

 You can see that the washing machine really helps get the extra dye out and give you the white look. If you aren't totally happy with the outcome, although I am pretty pleased, you can re-dye. You can also buy a bleach pen and do some touch ups! 

Next post I'll show you what I added to them to make them extra cool! I'll also show you how to pull these off out and about in the world. Thanks for reading :)

Wednesday, April 4, 2012

The Bethenny Frankel Look

I just recently got into the TV reality show Bethenny Ever After and I have to say I don't hate it!  It's silly to admit but I was really hesitant to actually like her and accept her into the pool of reality stars that actually did something with their lives post 15 minutes of fame.  It's because I recognize her from advertisements for The Real Housewives of New York City.  I don't really like those shows.  It's a lot of talking over each other and no one making any semblance of an intelligent argument.  I get it, that's what those shows are based around but I just don't want to watch it.  Any who, that's not the point.  The point is that I decided to add her show to my DVR and she redeemed herself in my eyes.  I also don't have to deny myself her Skinny Girl brand booze any longer!  (I can't be the only one who does stupid stuff like this... Right?)  Whether it's an act or not, and I don't think it is, I like her views toward business, people and clothes. 

Okay!  The "Bethenney Frankel Look" is a really classic outfit choice that I notice she wears constantly.  She does it well, too.  Here's the look breakdown:

The Bethenny Frankel Look  

Black Tank Top: Your basic black tank
Chain Braided Necklace: Forever 21
Blazer: Classic tweed blazer
Pink Pumps: Baff on Zappos.com

The Inspiration: Bethenny Frankel!
Oddly enough I had a hard time finding a photo of her in this look...

Styling Tips:
- This tip is one I got from watching the show.  This outfit looks great when you add a belt!  Try using the belt as a pop of neon color; very on trend for spring. 
- Make sure to get a blazer that fits and falls in a flattering place on your body.  If you get one that isn't quite right you are going to look sloppy and possibly add a few pounds.
- Based on the situation you have a lot of options for your makeup and hair!  Having a lunch meeting?  Go for something sleeker and more polished.  If you're taking it day to night you can throw your hair up in a volume-pony and add some extra eye makeup!
- Opting for slightly destroyed denim helps keep this look causal and young.  This look can be easily be dressed-up with a pair a straight leg capris or cigarette pants!
- This is one of those looks that look great on every body type!  Play with the length of your tank and the style of your blazer to get the right style for you.


Thank you for reading my blog! Please follow me for email updates and also, follow me on Twitter @soiree_bisou !!  Also, if you have anything to add please comment!  I want to start offering giveaways and contests for you all.

Friday, March 30, 2012

Colored Denim

Colored Denim
"Who needs a fun top when you have fun pants?"  


If you read my blog you might notice that I'm not all that over-the-top.  I like fashion statements not fashion "slaps in the face".  And colored denim is a really fun and easy way to make a fashion statement without getting those unwanted second glances (when the double-take is followed by the unmistakable "bad smell" disapproving face squish).  

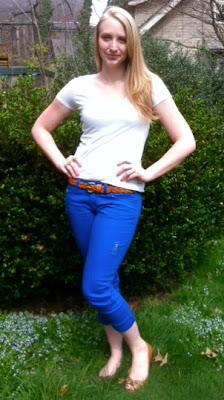
I definitely took the easy route with this outfit by pairing bright blue bottoms with a white t-shirt.  This isn't the most fashion-forward look but it's one that any girl could pull off.  


The Basics to Building A Colored Denim Look:
1.  Build off of your statement piece. (In this case; pants) 
2.  Make a definitive choice on your top before adding accessories. 
3. Add accessories that make the clothes look good on YOU.  For example: I felt weird without the belt, I needed to add it in order to create a break in the hips.  Another asset accentuating accessory could be a necklace if you have a great collar bone or earrings that compliment your face shape.
  Braided tan belt & a gold double-knuckle ring.
My go-to-gold tan Michael Kors flats.


Tips for Picking Tops:
- White or neutral variation is always a good fall back.  
- For a unique look pair your denim with a top that is a few shades lighter.  
(Focus on finding a less saturated hue, not a lighter version of a similar color)
- A pattern top with complimenting colors and simple styling will give your that "off the runway" look.

Tips for Pulling Off Colored Denim:
- Make sure your pants fit.  Seriously.  Try sitting in them to make sure you aren't hanging out in the back!  Nothing makes your look worse than clothes that don't fit.
- I'm 5'10'' so making sure pants are long enough is essential.  But NOTE: the pants I'm wearing are skinny jeans.  They were too short on me so I cuffed them into capris.
- Before buying a crazy color seriously ask yourself if you would wear it or not.
- To avoid frustration, either buy a top to wear with your jeans at the time of purchase or have one in mind from your closet before you buy.
- Bright blues are a great place to start if you want to test the style before committing to that awesome pair of raspberry red skinny jeans!

My colored denim: only $14.99 from TJMaxx

Some stores I like that carry colored denim at affordable prices: Target, TJMaxx, Macy's and Lucky Brand.


Thank you for reading! Please follow me for email updates and follow me on Twitter @soiree_bisou !!
Please, leave your comments so I can start doing giveaways and contests for all of you to benefit from!

Thursday, March 29, 2012

My $6 Felt Hat

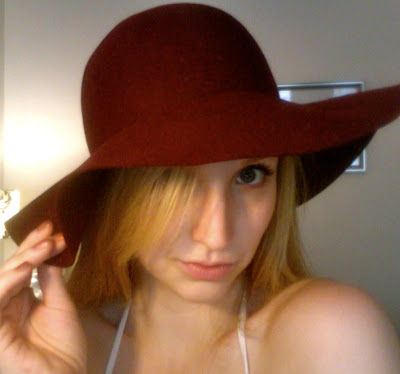
Today's blog post is all about me.  At least that's the impression you might get from my Mac Book Pro Photobooth photo session.  (Sorry in advance for plastering my face all over the post!)  But really, today I am tackling a Spring trend that can cause a real headache for some... pun-intended.  

Chic Hats in Smoldering Hues

I can't honestly say that this "trend" is trending... But I feel like I have seen it everywhere!  Especially with '70's flares and prints coming back around!  Call it a style foreshadow if you will.  For a celebrity reference for "chic hat" ideas my advice would be to google "Jlo in hat" and see what you find!  Personally, I feel weird in hats but I really want to be able to wear them.  The trick is finding a hat that actually looks good on YOU. 

Hats are kind of like sunglasses and you can't expect to buy one without trying it on first.  


My experience proves that you'll know if you like the way it looks or not the first second you look in the mirror.  You'll either think, "woah, I didn't expect to be able to pull this off!" or "eh, it looks ok but why does it make my head look funny?"  Only buy it if you think the former.  So, if there's no mirror in the hat department then I suggest you go find one!  

Since finding a hat that looks great is tough you want to make it go as far as possible.  I literally just stumbled upon this hat while walking into the mall through the Jcpenney's entrance.  It was $6 and just screamed, "try me on."  Success!  I found a chic hat in a great color that need just a little primping to look perfect.  So, here's how to accessorize a hat:

I have a lot of cute stretchy headbands that I hardly ever wear.  My guess is, most girls do!  They're cheap, easy to find and a really simple way to do your hair.  So I thought, "why not use them to change my hat?"

Plain hat.
Silver braided headband.
Beaded knot.
    Boho braided headband.  
Bling-bling.
Pretty Sequins.

One $6.00 hat ~ Six different ways! 

Tips for pulling off a hat:
- Utilize it!  By that I mean wearing a hat to an indoor event is pointless. But if you wear it to a picnic or to lunch during sunny days then you are not only stylin' but shaded.  
- Keep your makeup light and pretty because shadows over harsh and dark makeup can really create an intensely dark look.  
- Wear your confidence piece!  Whether it's a great pair of jeans or heels, wear it to help boost your confidence level while rocking a hat.
- Everyone knows you're wearing a hat.  Trust me, they didn't miss it.  You don't need to draw a lot of attention to it.. or yourself!


Thank you for reading my blog! Please follow me for email updates and also, follow me on Twitter @soiree_bisou !!

Tuesday, March 20, 2012

If You Can't Handle The Heat... Get Out Of The Yoga Studio!

Hot Yoga

DISCLAIMER: I am not a "yogi" and I definitely am not as amazing at yoga as the people out there who study it for years!  I love the workout, the sweat, the stretch and the peace of mind I feel after!  So, this is not coming from a pro... Just a random chick who likes hot yoga.
I've been going to hot yoga (different than Bikram yoga, I believe, because the practice is just done in heat) classes on and off since high school.  Only recently have I been learning to breath better and use my breath to push through hard poses.  All this sounds very "yogi" but truth is, I don't care about my third eye, I just want to be toned!  But I do love the heat part and getting to sweat out all your toxins.  Every time I go with a new person they almost always fall in love with it.  
Well, today during yoga class someone actually walked out in the middle of the practice!  I wanted to shout at the person and say, "you just did all the hard stuff and you're leaving before the easy stuff??"  Then I realized that people probably have no idea what to expect when coming to a hot yoga studio... So I'm going to tell all of you my tips for making it through and actually enjoying hot yoga!  Even if you don't buy into the whole "mind's eye" concept. 

What to expect:
It will be hot; above 90'F!  Good news is that it's not a sticky humidity feeling, it is much more like a sauna.  Get there a little early so that you have some time to adjust to the heat and sign up.  Most classes are an hour or more.  Stretch until your class starts!  The heat seriously helps to release tight areas.  Lay out your things near your mat, grab a block and just "get present".  
When your class starts, usually in child's pose, your teacher will start to instruct you on how to breath.  You breath in and out through your nose.  
Breath IN for length and OUT for openness 
You will sweat.  A lot.  You will sweat more than any other workout!  Just accept it and know that your clothes will be drenched and so will everyone else's.  Most yoga consists of a "strength" section where you do a lot of arm work and downward dogs.  This is where you will start to feel the cardio part of hot yoga.  Small movements will get your heart rate up and stay up.  Then there is a balancing section followed by back bends and sometimes abs.  The sessions I've been to, the teacher will come around and help you moderate poses.  They might touch you, and no you don't have to apologize for being sweaty!  The good news is that after the "strength" section most teachers mix in rest periods throughout the rest of the practice.  But know this, YOU CAN ALWAYS TAKE CHILD'S POSE whenever you need a rest.  You can always pause to wipe some sweat away and sip your water, too!  The end of the practice is the "sweet spot" is because you literally get to lay on the ground and knock a few minutes out of the way.  There are almost always a few men in each class, so guys, don't be shy!

What You Need:
- Yoga mat (most studios also have them available to rent)
- Hand towel (to wipe away sweat)
- Water bottle
- Mat length towel
- Dry t-shirt for after
- An open mind!
** I recommend "thirsty towels" for hot yoga.  They absorb a lot of sweat and stay pretty dry.  I have a hand towel one and a mat length one.  I lay the mat length one on the mat before I start and just leave it there the whole practice.  I use them to dry my dogs after their baths too!

My Tips:
- If you can, avoid chugging water during the workout, small sips are better.  I actually will feel kind of sick if I even sip water, so I just save it for after.
- Get over the fact that you're going to look like hell when you leave.  Make time for a shower before you have to be anywhere else.
- I wear old dance leotards and tighter workout capris.  Some girls wear sports bras, some people wear shorts, it's just a matter of what you're comfortable in.  But don't wear baggy clothes!!! 
- Participate in the "OHMs" because it does kind of wake up your body a little bit.
- Try getting out of your own head and attempt the breathing whenever it feels comfortable to do! I find that breathing helps the most during sequences involving plank and upward dog.  

Shout out to my favorite hot yoga studio!
Amazing Yoga- South Side! (Pittsburgh, PA)
(they are also in Wexford and Shady Side)
They always make you feel welcome and the teachers are always so great!  


UPDATE: I have been informed that Bikram is a whole different "hot yoga" practice in and of itself and it's done on carpet... So, good luck with that one everyone :) I'll stick to my hot vinyasa!

Anyone out there love yoga and really appreciate the practice?? I want to hear from you!  I want to know what it is that draws people to these retreats and what makes people so dedicated.


Thank you for reading my blog! Please follow me for email updates and also, follow me on Twitter @soiree_bisou !!

Monday, March 19, 2012

BB Cream!

Amazing beauty product alert!!!

Garnier Fructis BB Cream
I know what you're thinking.. What the hell is BB cream??  Well, I did a little light Googling and found out that the BB stands for "Beauty Balm".  This one product does all kinds of great things for your complexion.  There's SPF 15 (and YES we all need to wear a little SPF) but my favorite part is how it is a tinted moisturizer!  If you have relatively good skin and don't rely on heavy foundation to get full coverage then let me introduce you to your new BFF... If you DON'T have awesome skin and need a little boost then this product is also for you!  With acne fighting properties on it's long list of benefits this cream also serves as an amazing primer!  The main purpose of this product is to ultimately give you an even skin tone and a fresh glow.  BB creams also work as a correcting agents so you aren't masking anything!  You are actually fighting your problems while still looking great.  I have been a huge fan of tinted moisturizers for a long time.  Now, I can use my staple beauty product and get a lot more than just great coverage and moisture out of it!  Anything to get girls to moisturize! (Seriously, use lotion and take a multivitamin and you will notice a huge difference in your skin)  Anywho, enough lecturing... Here's another really great tinted moisturizer.


Cargo SPF Tinted Moisturizer 
(note: this product is ONLY tinted moisturizer and SPF, it does not have all the other benefits of a BB cream)  

Tinted Moisturizer Tips:
- Buy the right shade (just pay attention to what you're grabbing off the shelf)
- Apply (first) with a foundation wedge
- Don't neglect your hairline, neck line or under your brow bone
- Allow a few minutes for the moisturizer to set in and dry (it does have a light fragrance to it but that dissipates as it dries)
- Follow up with your powders and bronzers once dry to help set the BB cream 
- DO NOT cake it on!  This is not foundation, it is moisturizer so if you use too much you'll feel oily and gross


Now go get amazing skin!  The BB Cream is sold at places like Target and drugstores for about $12.99.  The Cargo tinted moisturizer can be found at Ulta.  Sephora carries some of the Cargo line (which I recommend) but Ulta has a much bigger selection of it!  Also, the Cargo tinted moisturizer comes in a few different bottle shapes.  

Thank you for reading my blog! Please follow me for email updates and also, follow me on Twitter @soiree_bisou !!

Sunday, March 18, 2012

Get Shellacked!

I HATE acrylic nails.  I hate the way they feel, the way they look when your nails grow but mostly how much they screw up your natural nails.  If you don't have the cash to keep up with acrylic nails I would say to just stay away!  With that being said, I was kind of hesitant to try the new "UV" shellac nail polish because I heard that it has a similar affect on your nails.  I also hate trying to keep up with my half-ass manicure I did while running out the door...  So, I went ahead and got shellacked.  
Yes, I am holding my remote but check out the chip free nails!  It's going on six days now and I am already impressed.  For starters, I was wrong about thinking that it would ruin your nails.  Whoever told me that was wrong because I actually think this polish could help your nail's health.  In other words, by having polish on at all times your nails are less likely to be dry and brittle.  More good news?  It doesn't take any longer than a traditional manicure.  Your polish is bone dry and smudge proof before you walk out the door and dig for your keys only to end up with a chunk of polish missing.    

What should you expect?  Basically, what your manicurist will do is start with a typical manicure and clean up your nails and nail beds.  Then they apply a bunch of different special polishes and you alternate putting your nails under a UV light to dry and getting another layer put on.  Then after a few minutes of final dry time, they wipe your nails with a cloth and BAM!  They're dry.  Two weeks, no chipping!

Ready to get shellacked??  Go to the right place because, like acrylics, some manicurist can screw this up leaving you with thick, chipping nails.  I recommend California Nails in Wexford.  It is located in the new plaza with the new Market District!  $35.00 for a shellac manicure and ask for Kimy, although everyone there is great.  (If you're not in Pittsburgh read around for some good reviews before committing to a place!)  Also, check Living Social and Groupon for deals!


Thank you for reading my blog! Please follow me for email updates and also, follow me on Twitter @soiree_bisou !!

Tuesday, February 28, 2012

The Things I Care To Share: Styled by Me

-New look, check it out!

Thank you for reading my blog! Please follow me for email updates and also, follow me on Twitter @soiree_bisou !!

Notes On A Party

I am a wedding planner and a party thrower so a lot of my time is invested in all things parties.  I know, it sounds like such an awful job but someone has got to help plan!  I love sharing ideas for parties with anyone because you never know whose party you'll be attending next.  Basically, these are three of my favorite party throwing tips and three of my cheapest!  

Mason Jar Prepared Drinks
You will need: Mason jars (around 2 per guest), labels, and serving buckets
Offering your guests drinks that you have already mixed is a great way to get a drink in everyone's hand.  For our Christmas party this past year, my friend Bethany and I used mason jars to serve drinks.  We offered sangria, a bailey's drink, something with vodka and something with rum. (No mixers with carbonation!)  We were able to buy cheaper booze and save a lot of money.  Whatever mixers and alcohol we didn't use for the mason jar drinks we set up in the bar area for guests to make their own versions of our drinks.
 Side note: always have wine glasses handy because wine-os usually bring their own bottle!

How to serve mason jar drinks: 
Always offer straws, have a basket for lids, use an ice bucket/cooler or display them in your refrigerator.
Drinks that work for mason jars: 
Mixed drinks with no carbonation, sangria, punches, dessert style cocktails, margaritas, etc...
Where to buy: 
Grocery stores around canning time, trader horn, craft stores, home improvement stores, Walmart, etc...

Napkin Conversation Starters
What you will need: a variety of witty cocktail napkins
A witty napkin generally goes unappreciated.  But when you throw a bunch of people into a room and pass around a funny cocktail napkin to go with their drink, they may get a kick out of it!  This is one of my personal little party touches.  It's not always appropriate to have these if you're going for a certain formality and there is no Hallmark for napkins so you may not find the perfect one.  I buy these little suckers whenever I see them on sale.  They're so cheap and I can just throw them in my party supply box for later use.

Where to buy:
TJMaxx, Target, party supplies stores, clearance bins, etc...

Water Bottles
You will need: water bottles!
One of the best things you can do for you guests after liquering them up is to offer them water bottles.  This way they can just take them out the door with them or straight to which ever couch they're crashing on.  Also, this saves a lot of extra glasses that you won't need to wash the next day.  They don't need to be cold and you don't need to display them nicely if you don't want to.  Just buy a pack and have them handy, everyone including yourself will be glad you did.


Thanks for reading my blog & don't forget to follow me on Twitter @Soiree_Bisou !!